For many businesses, if you’re only tracking conversions that occur directly on your website, you’re likely missing a complete picture of how ads impact sales.
A potential customer might click on your ad only to pick up the phone to speak with a sales rep instead of filling out a form.
If your business has physical branches, a shopper might visit you in person to buy after initially discovering you via an ad.
Additionally, privacy regulations and the next tracking challenges sometimes limit the ability of pixel and cookie-based tracking to correlate conversions to ad platforms properly.
While no tracking setup will ever have 100% clean data, offline conversion tracking can help address each scenario.
Whether you have a robust CRM setup or store leads in spreadsheets, updating your Google Ads conversion setup to incorporate offline data is possible with the right tweaks to your process.
In this article, I’ll cover three ways that you can start incorporating offline conversions in your Google Ads account:
- Conversion import.
- Call tracking.
- In-store visit tracking.
Importing Conversion Data
Google Ads allows you to import offline conversion data and associate attribution with your campaigns as long as you can grab and store the original user’s GCLID (Google Click Identifier) to associate with each conversion action the user completed.
This setup can be handled via custom development work or an option your CRM or automation platform can automatically take care of.
For instance, you might want to import data for closed sales deals that initially entered your CRM via Google search ads. Or, if a purchase requires some manual back-and-forth to complete, you can upload sales data after the fact with the revenue amount included.
Setting Up The Conversion
To start, create a new conversion and select Import from the list of conversion types.
 Screenshot from Google Ads, September 2022
Next, you’ll select the source from which to import conversions.
If you use Salesforce, they have a direct integration into Google Ads that allows importing data based on milestones in the platform. You can also import from “other data sources or CRMs” to utilize a spreadsheet or third-party connection.
Once you select the latter option, you can then choose to import either call-based data or click-based data. For now, I’ll focus on data from clicks and address calls in more detail.
On the next screen, name your conversion and choose the category. Suppose you’re trying to associate leads with steps in the sales funnel. In that case, you can choose options such as Qualified lead or Converted lead, or if a direct sale with quantifiable revenue can be attributed to a user, select Purchase.
If applicable, you can associate a specific value or choose a dynamic deal if revenue varies per conversion.
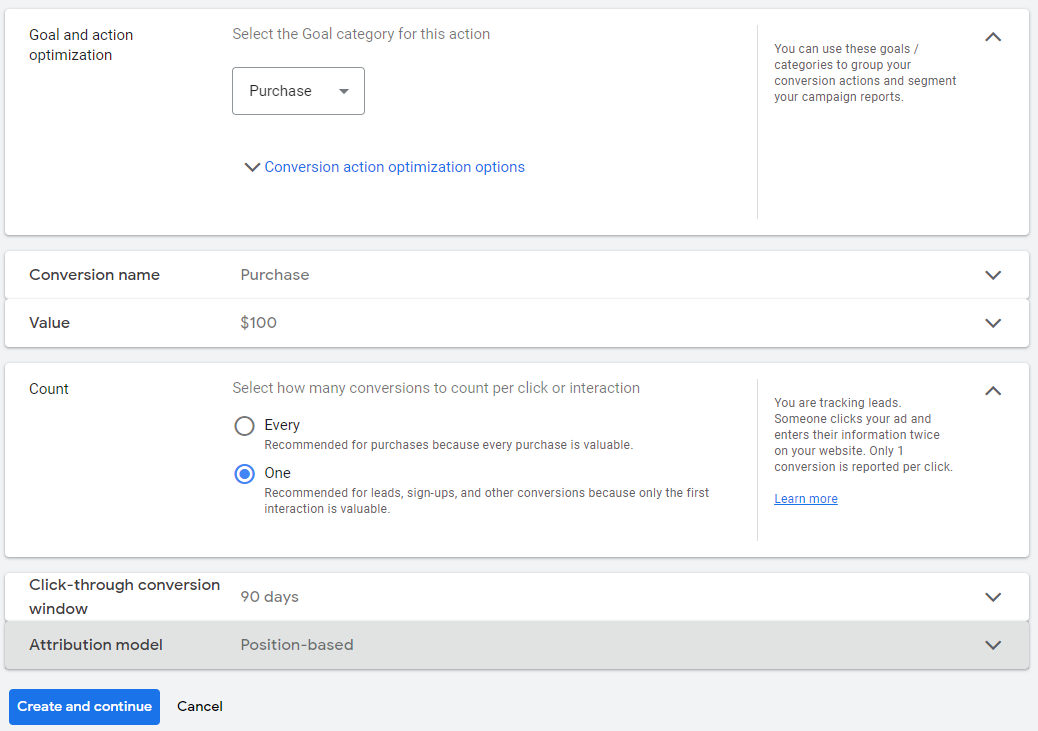 Screenshot from Google Ads, September 2022
Once you’ve selected the options you want, save the conversion. You’re now ready to start importing data.
Preparing Your Import Template
To import data, start with a template in your desired file format (Excel, CSV, or Google Sheets). Templates are available here.
First, modify the timezone field to reflect the proper time for your region (e.g., Parameters:TimeZone=-0500 for EST).
Next, you’ll need to add the proper data into the sheet, using a separate row for each conversion, including the following columns:
- Google Click ID: The GCLID associated with the conversion.
- Conversion Name: This should match the name for the conversion in your Google Ads account.
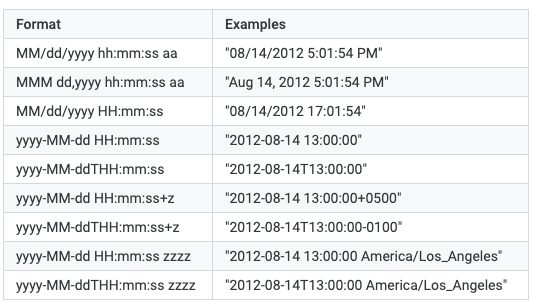
- Conversion Time: The date and time of the conversion. Here are acceptable formats courtesy of Google’s support page.
 Screenshot by author, September 2022
- Conversion Value & Currency (optional): If you’re tracking revenue, these fields include the associated value of the conversion, as well as the currency, using three-character currency codes. See a list of acceptable currency codes.
Importing The Data
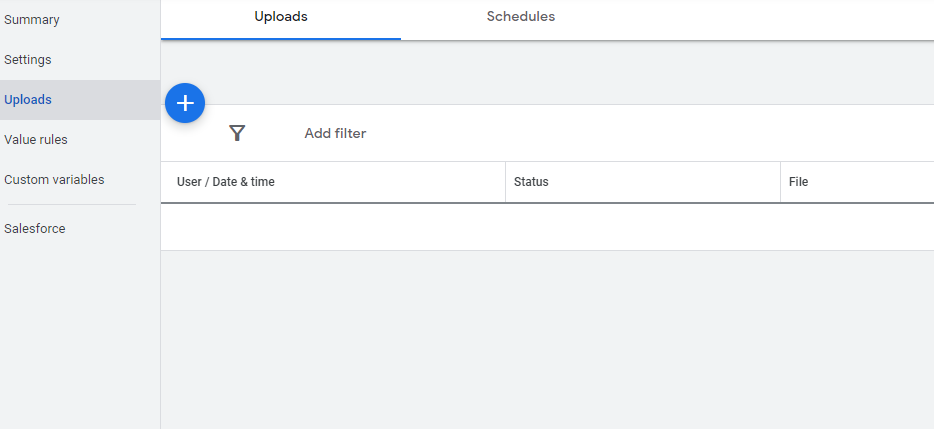
To import the document you’ve prepared, go to the Conversions section of your account and select Uploads from the left sidebar.
Click the plus sign to start your upload.
You can then choose to upload a file, sync with a Google Sheets document, or connect to an HTTPS or SFTP-hosted file.
 Screenshot from Google Ads, September 2022
Once you’ve uploaded your file, click Preview to ensure that the data matches the conversions in the account correctly.
The results page will flag any errors with your document.
If you’re satisfied with the results, select Apply to sync the conversions with your account.
Note that you’ll need to wait a few hours before conversions appear in the interface.
Scheduling Uploads
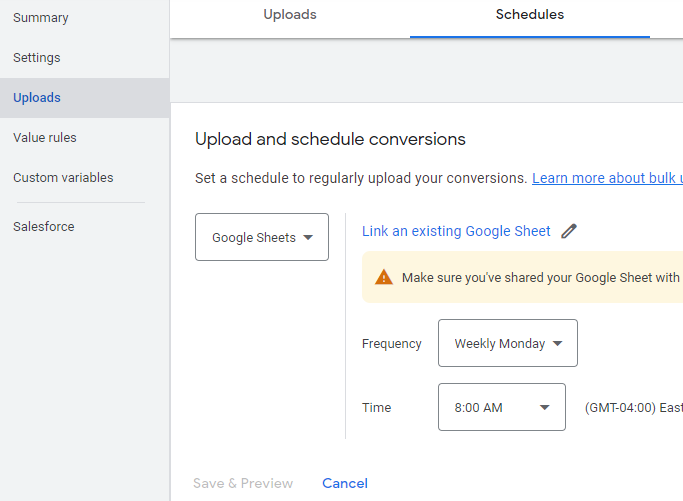
In addition to manual uploads, you can schedule regular data uploads from a Google Sheets document, HTTPS, or SFTP.
This can help save time and automate the process if you can automatically sync a spreadsheet or database file to pull conversion data from your CRM.
 Screenshot from Google Ads, September 2022
Select Schedules, click the plus sign to create a new upload, and choose the source.
Next, you can choose the frequency, which can either be daily or weekly for any day of the week and hour.
Phone Calls
For some businesses (particularly those in service industries), phone calls are the primary source of inquiries.
For instance, a past tech support client received around 80% of PPC leads via phone.
If you tend to get new business inquiries from calls, you should implement phone tracking to attribute these leads correctly.
Call Extensions
First, make sure you’ve set up call extensions within Google Ads, allowing a phone number to show up with ads in search results.
Navigate to Ads & Extensions > Extensions to begin setting these up. Add a new extension and select Call Extension.
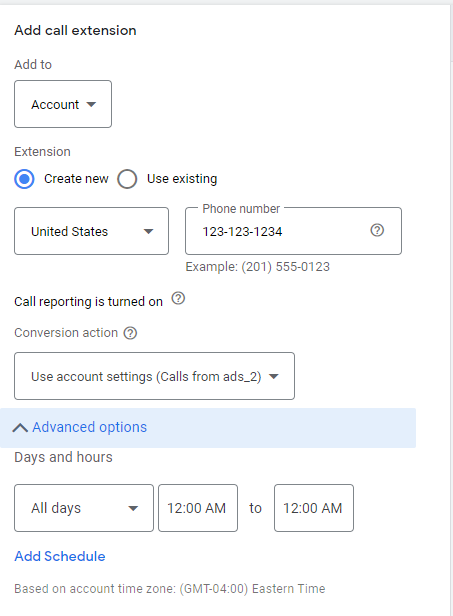 Screenshot from Google Ads, September 2022
Mobile users can click the number to call the business directly.
You can even try call-only ads to give people the option to call when browsing from a phone.
Google also provides an option to turn call reporting on, allowing a unique forwarding number to be used. This tactic will let you correlate calls down to the ad and keyword level in the account.
You can also choose to count only calls with a minimum duration, so you can eliminate brief calls that likely did not result in business.
For instance, my client found that calls lasting longer than 3 minutes and 30 seconds generally tended to be the most qualified, so we set the call conversion to track only calls with at least 210 seconds.
Website Call Reporting
Next, you should also make sure to track calls that occur from your website after the ad click.
In addition to ad extensions, Google offers an option to use their forwarding number setup for your site, where users will see a unique trackable number instead of your regular number.
You’ll see data reflected in your Google Ads account after users call.
Under the Conversions section of your account, create a conversion and select Phone Calls.
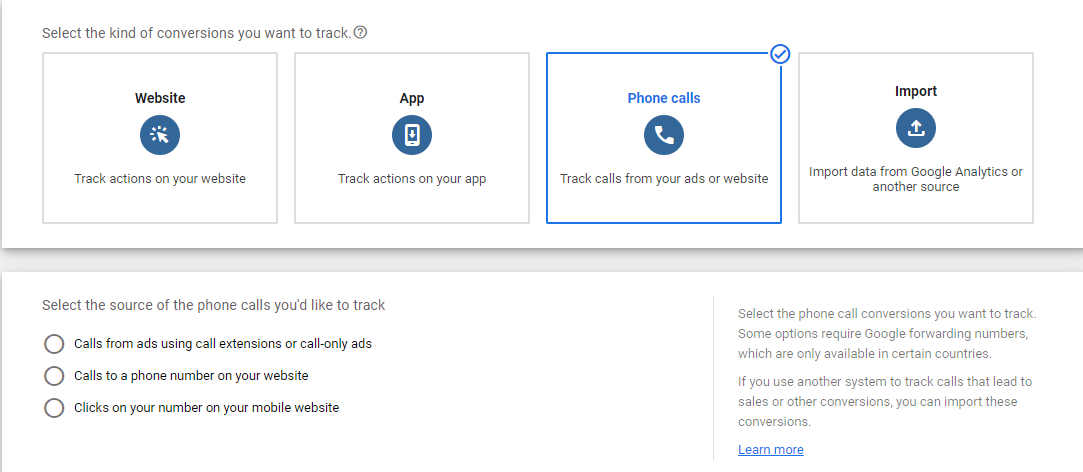 Screenshot from Google Ads, September 2022
You can choose between:
- Calls to a phone number on your website (which requires using a forwarding number).
- Clicks on your number on your mobile website (which doesn’t use a forwarding number but still requires adding a tag to your site).
For this example, we’ll go with Calls to a phone number on your website to ensure all calls are tracked and call reporting data goes into Google Ads.
You can define the details of the call conversion, including the call length, as discussed previously. Once you’ve configured the conversion, you’ll see instructions for adding a tag to your site to trigger the forwarding number when users visit your site.
Once the conversion is enabled and the site tag is configured to track phone calls, you should start seeing call conversions reflected in your account.
In-Store Visits
If you’re promoting sales at a physical location, store visit conversions can track if people visit in person after clicking ads.
Google uses location data from mobile devices to determine if those who previously engaged with or viewed ads came to your store.
Store visit conversions are only available to advertisers in eligible countries who have multiple physical locations and receive high click and impression volume, as well as enough store visit data to meet privacy thresholds.
Unfortunately, Google’s documentation is vague about the exact thresholds to meet. Also, note that some sensitive product categories may not be eligible for store visit tracking.
You’ll need to ensure you’ve claimed and verified your store locations in your Business Profile.
You’ll also need to activate location extensions in your account.
Once you’ve completed these steps and met Google’s requirements, your account should start to report store visits.
Once you start seeing store visit data in your account, conversions will show both in the “All conversions” and “View-through conversions” columns, with a new conversion action named “Store visits” added to reports.
Note that data is anonymous and aggregated, so the numbers won’t be exact.
Google’s documentation indicates that reports will become more accurate with larger data sets, recommending reporting on periods with at least 100 store visits.
Time To Set Up Offline Conversions
If you’re not already taking advantage of this feature, think about how offline conversion tracking could help to improve your PPC efforts.
Do you have multiple steps in the lead nurture process that you’re not currently attributing to conversions in Google Ads?
Are new customers frequently calling your business as the first point of contact?
Does your business see frequent sales occur in physical locations?
While the legwork to prepare for importing offline conversion data can be somewhat involved, the payoff makes the process worthwhile.
Ultimately, you’ll be able to feed more accurate data to the platform for it to better optimize around accurate conversions.
More Resources:
Featured Image: fizkes/Shutterstock
