The header bidding technology started to develop in 2015, and has since helped many publishers to grow their revenue by as much as 40% (and even, in some cases, to levels of 100% or more.)
What Is Header Bidding?
Header bidding is a cutting-edge technique where publishers offer their ad inventory to many ad exchanges, also called Supply-Side Platforms (or SSPs), simultaneously before making calls to their ad servers.
Here are the steps a publisher needs to pass to have this technology power up its monetization.
- Apply to SSP partners and get approval.
- Implement Prebid.JS on website.
- Configure ad server.
- Choose a consent management system.
- Test and debug.
Applying To SSP Partners
There are hundreds of SSP partners available in the list to apply, but I would like to mention what I believe to be the most popular ones:
- TripleLift.
- Index Exchange.
- Amazon UAM/TAM.
- Xandr (formerly AppNexus).
- Teads.
- Pubmatic.
- Sovrn.
- Verizon.
- Magnite (formerly Rubicon).
- OpenX.
- Sonobi.
- GumGum.
- Sharethrough.
- Unurly.
One needs to find their online application form and pass through the company’s verification process. For example, in the case of Xandr, the contact page looks like this:
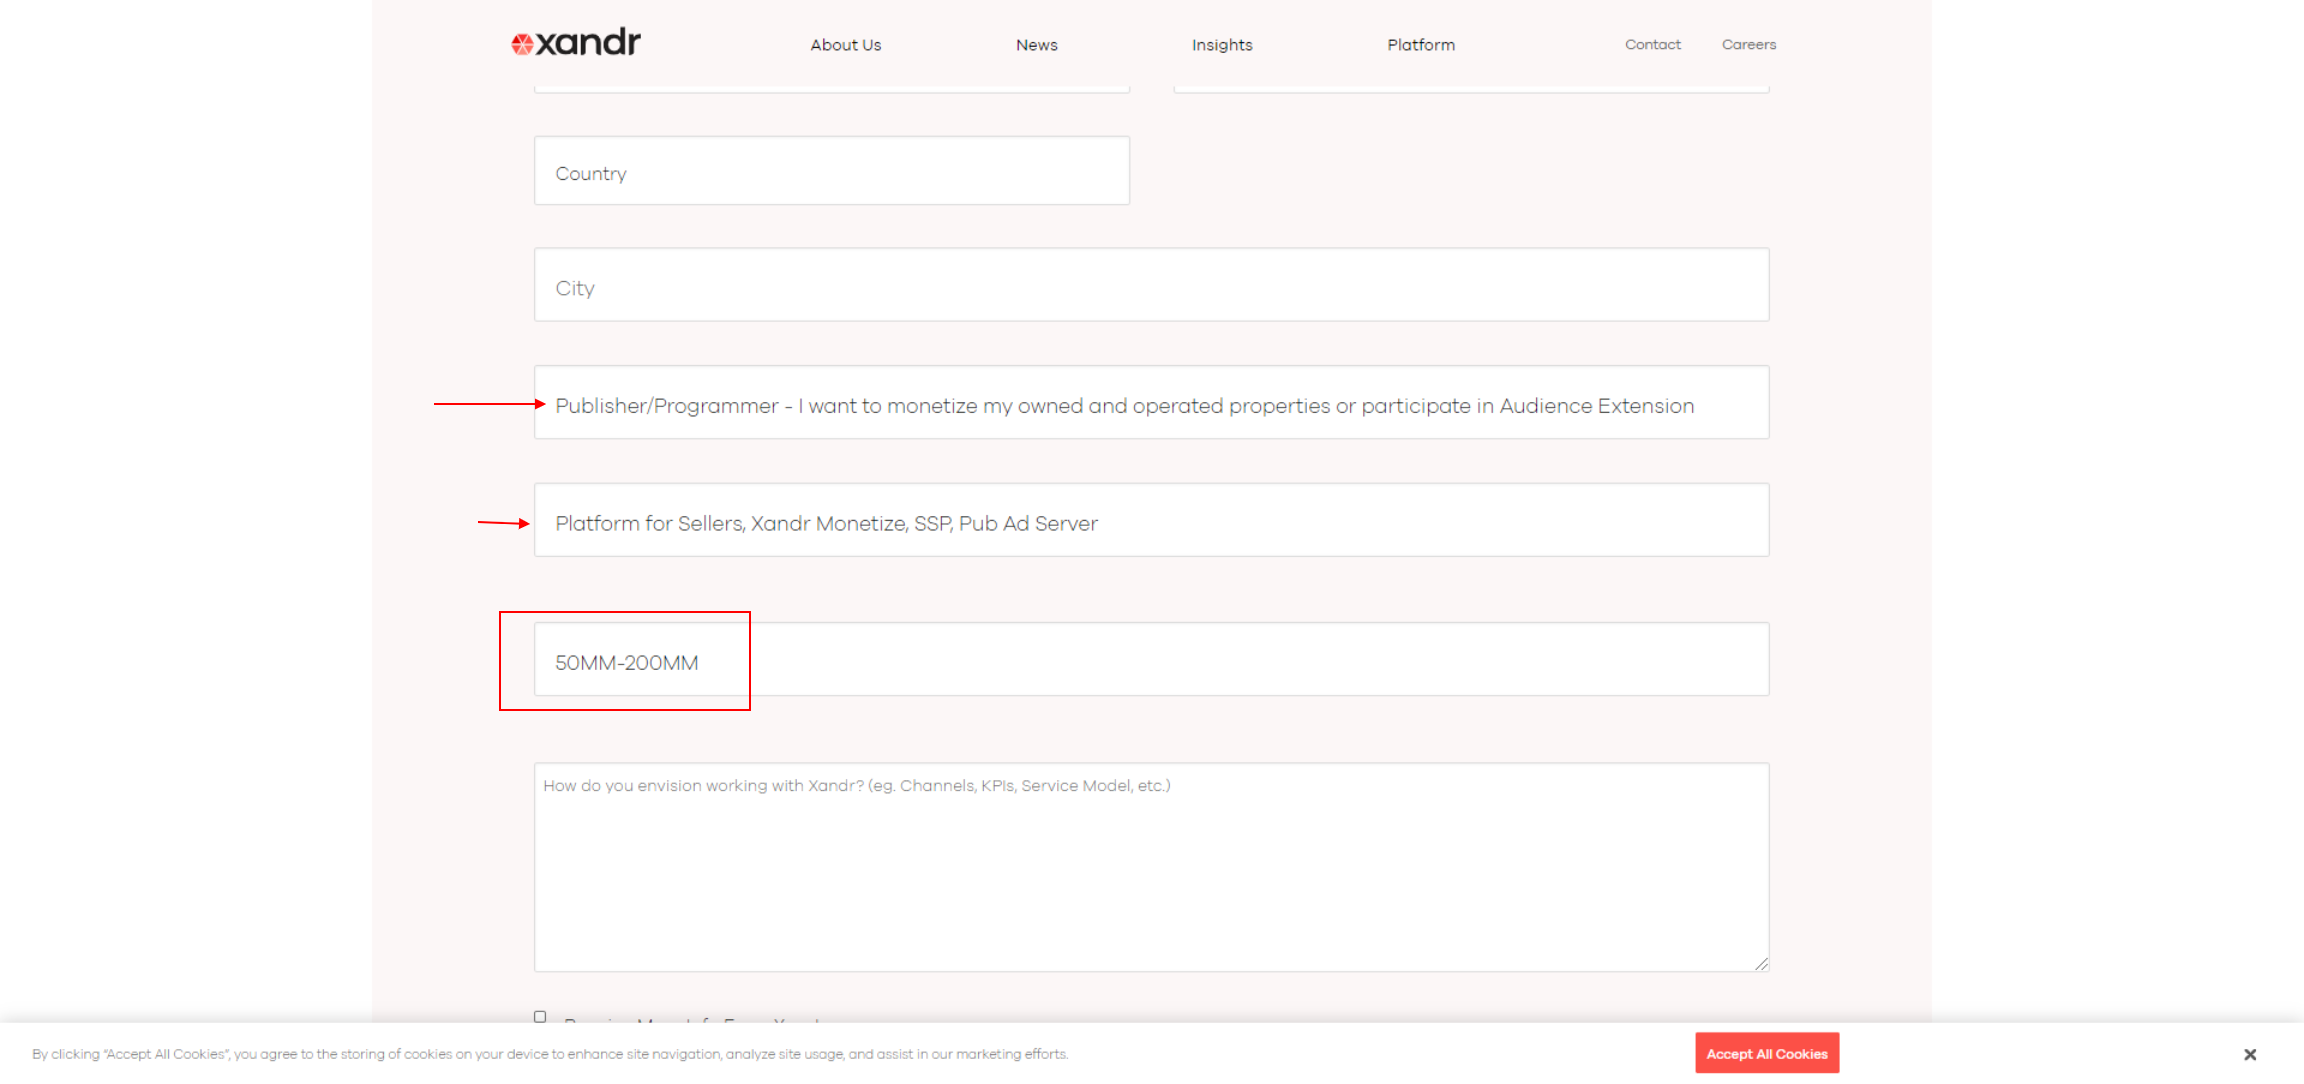 Screenshot from Xandr, December 2022
Pay attention to the minimum inventory size required to be eligible for applying.
Yes, that is a staggering high of 50M ad impressions a month.
You may need quite an impressive website to be able to apply to some of the ad networks. We will call them further bidders, as they bid on inventory in real time.
However, not all SSPs have such high thresholds for application. For example, Sharethrough only requires 20M ad impressions.
Besides, they consider also audience quality, traffic geolocation, how much time users spend on the website, etc.
It typically takes a few weeks after applying to be approved and onboarded with them, so it can be a fairly time-consuming process that may even take months to finish.
How Does Prebid.js Work?
In nutshell, here is how Prebid.js works.
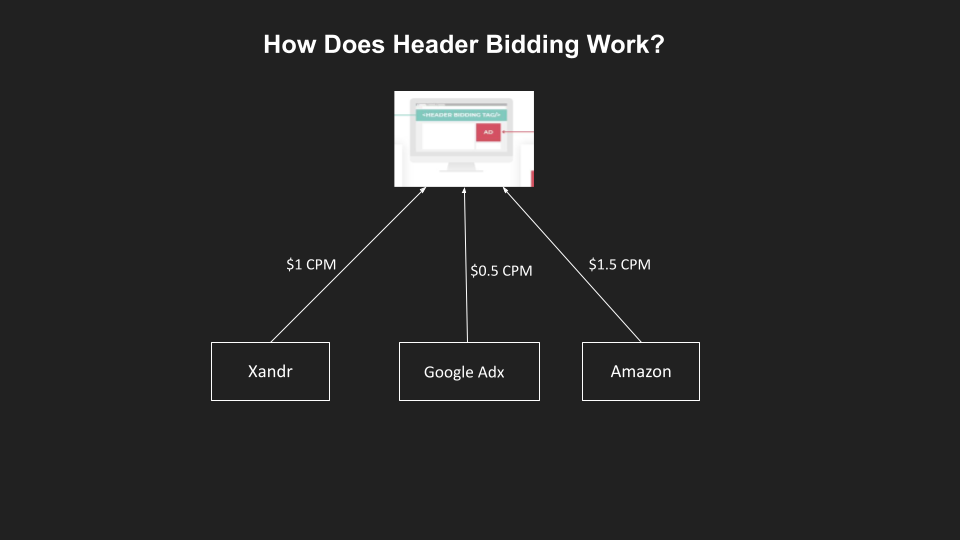
When a user opens a webpage, an ad request is made to all bidders (SSP partners).
Bidders respond with their CPM bids – let’s say $1 and $1.50 – and Prebid.js makes a request to the ad server, with the highest CPM targeting. In this case, that would be $1.50.
At the ad server, in our case, Google Ad Manager, the request is received and it knows that someone is paying $1.50 USD CPM for an ad. It runs another auction with Google Adsense or AdX.
If Google offers a higher CPM, then the Google Ad will be served.
If not, our ad with $1.50 CPM will win, and be served by our SSP partner.
-
 Screenshot from Google Ad Manager, December 2022
The trick here is that auctions happen in real-time, which creates buying pressure on Google AdX to pay the highest CPM possible.
If Google AdX doesn’t have any competition, it will offer the lowest CPM possible –as it wants to buy inventory for the cheapest price possible.
With header bidding, bidders are able to compete and push CPMs (and therefore revenue) up.
There are two ways to implement header bidding:
- Client-side: When the auction runs via JavaScript in the browser.
- Server-side: When the auction is run on the server.
Let’s discuss client-side header bidding.
How To Implement Client-Side Header Bidding
In order to set up header bidding, we need to implement Prebid.js on our website and configure our Google Ad Manager (or ad server).
Implement Prebid.js On Your Website
Prebid.js is a header bidding platform that has more than 200 demand sources integrated.
You need to select the SSP partners you are working with from the customize page and download the library built for your specific configuration.
Don’t forget to select Consent Management modules to comply with GDPR and GPP privacy standards.
Below is the sample code taken from the official documentation.
<html> <head> <script async src="//www.googletagservices.com/tag/js/gpt.js"></script> <script async src="//your-customized-prebid.js"></script> <script> var div_1_sizes = [ [300, 250], [300, 600] ]; var div_2_sizes = [ [728, 90], [970, 250] ]; var PREBID_TIMEOUT = 1000; var FAILSAFE_TIMEOUT = 3000; var adUnits = [ { code: '/19968336/header-bid-tag-0', mediaTypes: { banner: { sizes: div_1_sizes } }, bids: [{ bidder: 'appnexus', params: { placementId: 13144370 } }, { bidder: "conversant", params: {site_id:"122869",secure:1} } ] }, { code: '/19968336/header-bid-tag-1', mediaTypes: { banner: { sizes: div_2_sizes } }, bids: [{ bidder: 'appnexus', params: { placementId: 13144370 } }, { bidder: "conversant", params: {site_id:"122869",secure:1} } ] } ]; var googletag = googletag || {}; googletag.cmd = googletag.cmd || []; googletag.cmd.push(function() { googletag.pubads().disableInitialLoad(); }); var pbjs = pbjs || {}; pbjs.que = pbjs.que || []; pbjs.que.push(function() { pbjs.addAdUnits(adUnits); pbjs.requestBids({ bidsBackHandler: initAdserver, timeout: PREBID_TIMEOUT }); }); function initAdserver() { if (pbjs.initAdserverSet) return; pbjs.initAdserverSet = true; googletag.cmd.push(function() { pbjs.que.push(function() { pbjs.setTargetingForGPTAsync(); googletag.pubads().refresh(); }); }); } // in case PBJS doesn't load setTimeout(function() { initAdserver(); }, FAILSAFE_TIMEOUT); googletag.cmd.push(function() { googletag.defineSlot('/19968336/header-bid-tag-0', div_1_sizes, 'div-1').addService(googletag.pubads()); googletag.pubads().enableSingleRequest(); googletag.enableServices(); }); googletag.cmd.push(function() { googletag.defineSlot('/19968336/header-bid-tag-1', div_2_sizes, 'div-2').addService(googletag.pubads()); googletag.pubads().enableSingleRequest(); googletag.enableServices(); }); </script> </head> <body> <h2>Basic Prebid.js Example</h2> <h5>Div-1</h5> <div id='div-1'> <script type='text/javascript'> googletag.cmd.push(function() { googletag.display('div-1'); }); </script> </div> <br> <h5>Div-2</h5> <div id='div-2'> <script type='text/javascript'> googletag.cmd.push(function() { googletag.display('div-2'); }); </script> </div> </body> </html>
Let’s break down the code above.
- The first lines load all required JS files and our customized Prebid.JS file.
- Ad slots are defined in the adUnits array variable.
- In the adslot definitions, you can see the SSP partners’ names and IDs you will be given when onboarding when them.
- googletag.pubads().disableInitialLoad(); is called to disable ad request to be sent to Google Ad Manager until Prebid.js finishes the auction.
- pbjs.requestBids function calls SSP partners and determines the winner.
- initAdserver() function is called to send an ad request to the Google Ad Manager with hb_pb key, which contains the winning CPM value, e.g. hb_pb=”1.5″. (This step is connected with setting up Google Ad Manager in the next step.)
- When Google Ad Manager gets the request with the winning bid, it runs its own auction in Google AdX, and sends back either the AdX ad with a higher CPM, or the ad of the winning SSP.
For your specific case, you may need to code differently and change the setup, but the principle stays the same.
Other than that, I would like to quickly go over how to implement lazy loading, because it is a little different.
How To Implement Lazy Loading
The Google tag for publishers has a lazy loading framework which will not work in the case of header bidding.
This is because you need to run an auction, and determine and set key values before sending a request to the ad server.
Because of that, I would advise using the Intersection Observer API to determine when to load the ad in the HTML <div> tag when it is about to enter into the viewport.
options = {
root: null, // relative to document viewport
rootMargin: '1500px', // margin around root. Values are similar to css property. Unitless values not allowed
threshold: 0 // visible amount of item shown in relation to root
}; your_observer = new IntersectionObserver( observer_handler, options );
your_observer.observe( goog_adslots[i] );
In the observer_handler call back function, you can run the prebid auction and call the ad server.
function observer_handler( entries, observer ) { dynamicAdUnit =[{
code: 'your_html_div_id',
mediaTypes: {
banner: {
sizes: [728,90]
}
},
bids: [{ bidder: 'appnexus', params: { placementId: 13144370 } }, { bidder: "conversant", params: {site_id:"122869",secure:1} } ]
}]; pbjs.addAdUnits(dynamicAdUnit); slot = window.googletag.defineSlot('/1055389/header-bid-tag-0', [728,90], 'your_html_div_id' ).addService(googletag.pubads()); lazySlotPrebid(slot, 'your_html_div_id') } function lazySlotPrebid(slot, div_id) { pbjs.que.push(function() {
pbjs.request bids({
timeout: PREBID_TIMEOUT,
adUnitCodes: [div_id],
bidsBackHandler: function() {
pbjs.setTargetingForGPTAsync([div_id]);
googletag.pubads().refresh(slot); });
}); }
}// endd of initDynamicSlotPrebid
Now, let’s jump on setting up the ad server using Google Ad Manager.
How To Set Up GAM For Header Bidding
Ad servers need to have dozens of price priority line items with key hb_pb targeting all possible CPM values, such as hb_pb=0.04, hb_pb=0.03, etc.
-
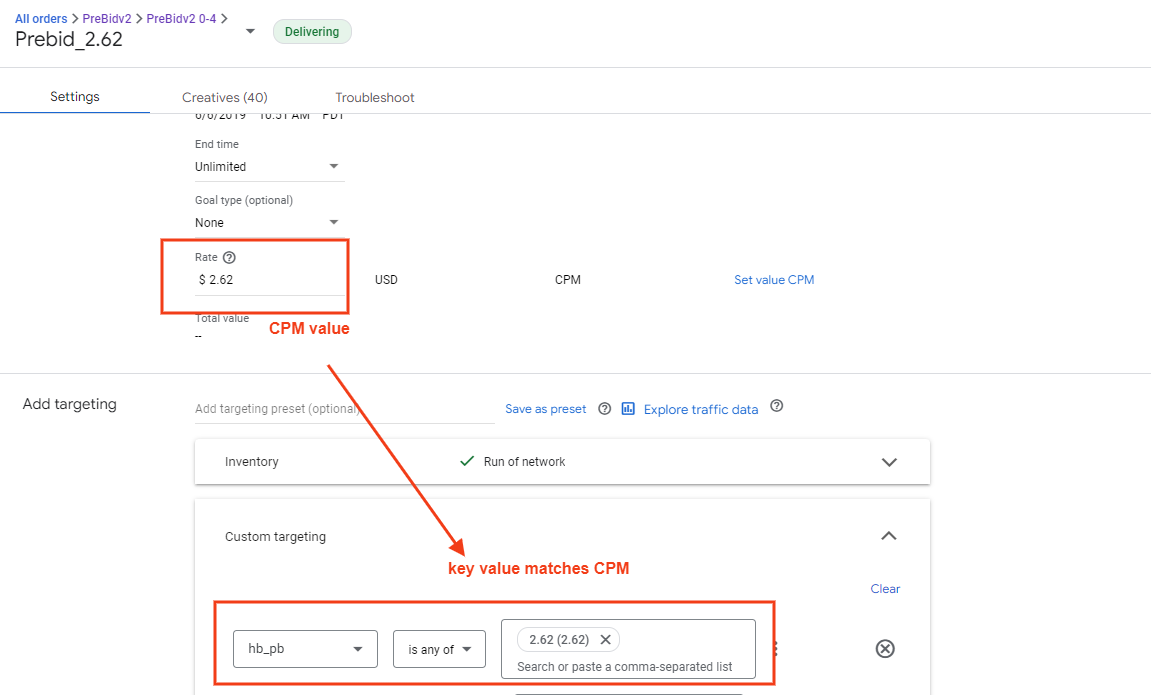 hb_pb key value targeting
This is the key point that makes the header bidding engine work.
- The auction runs in the browser on page load.
- The winning SSP partner is sent to GAM with a key value targeting hb_pb = 2.62.
- Since the order has the same CPM value, GAM understands that there is a bid at $2.62.
- GAM runs an AdX auction and has to pay more than $2.62 in order to win the bid and display a Google Ad.
As I mentioned above, you would need to build line items in GAM with certain granularity, say 0.01 – and for the CPM range $0-$20, you would need to create 2,000 line items, which are impossible to do manually.
For that, you would need to use GAM API.
Unfortunately, there are no solid solutions that you can simply download and run in one click.
It is a somewhat complex task, but thanks to contributors who built API tools (even though they are not actively supporting them), we can still modify it a little and make it work.
Let’s dive into how to set up Google Ad Manager and understand the following:
Step 1: Enable API Access
In the Google Ad manager Global > General settings section, make sure API access is enabled.
Click on the Add service account button and create a user with the sample name “GAM API USER” and email “gam-api-user@sej-dfp.iam.gserviceaccount.com” with admin rights.
-
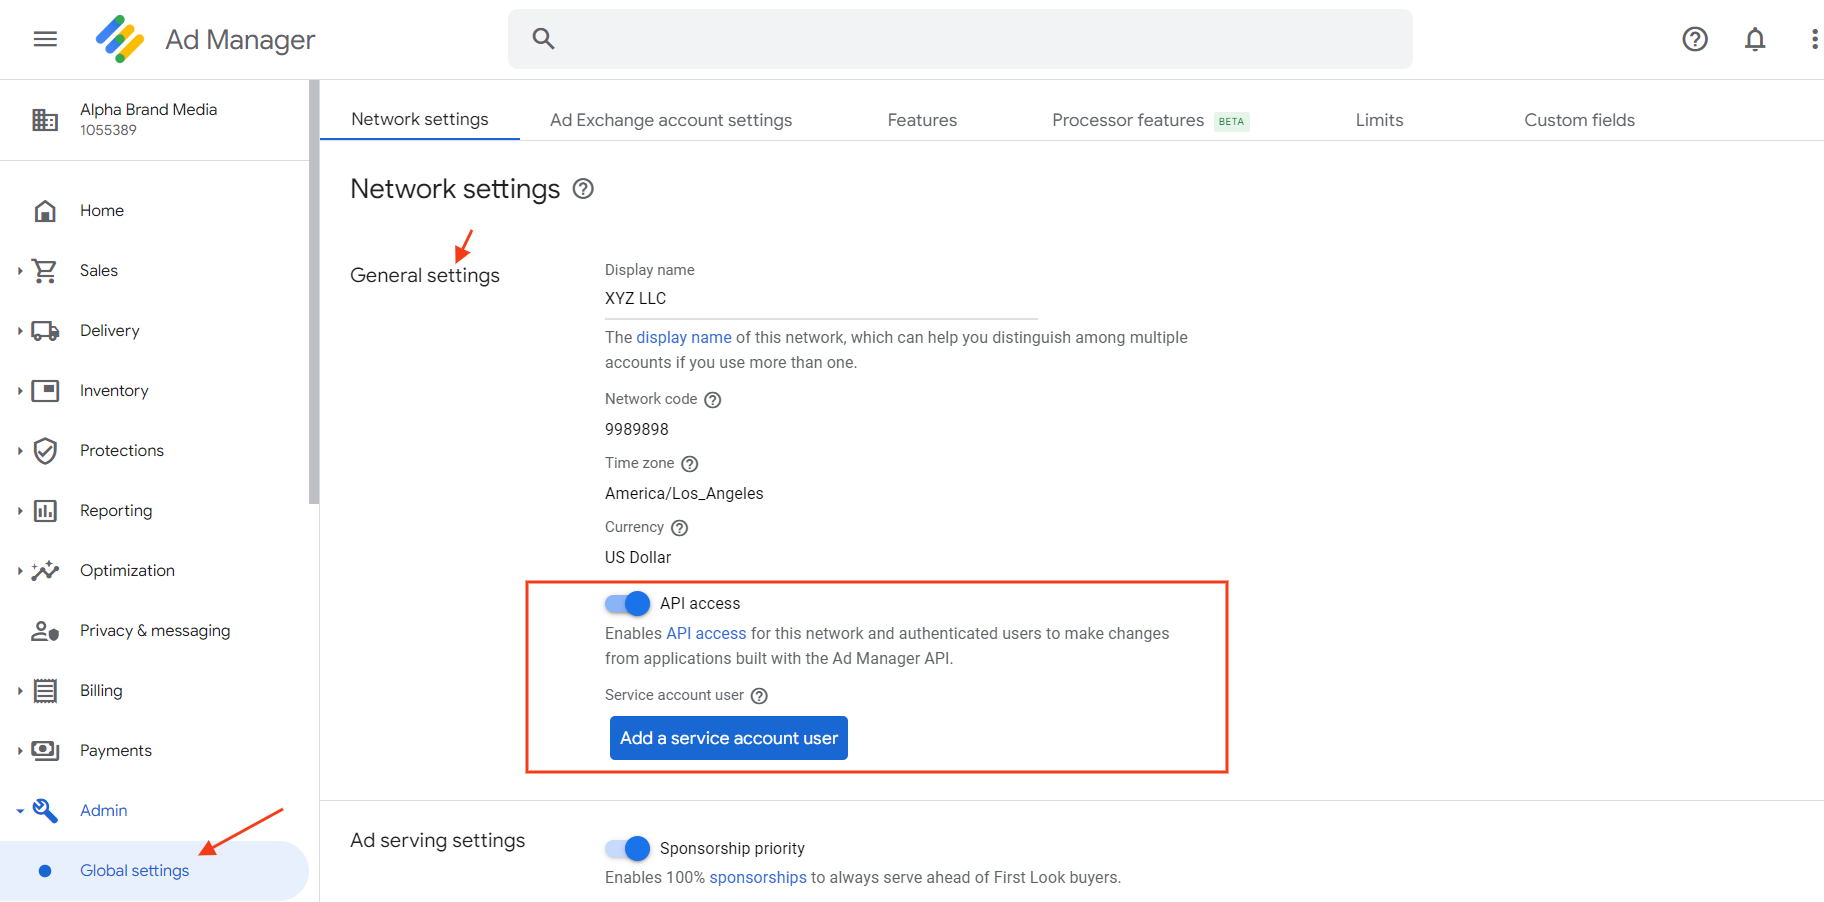 Screenshot from Google Ad Manager, December 2022
Step 2: Create A New Project
Navigate to Google API Console Credentials page.
From the project drop-down, choose Create a new project, enter a name for the project, and, optionally, edit the provided Project ID.
Click Create.
On the Credentials page, select Create credentials, then select Service account key.
Select New service account, and select JSON.
Click Create to download a file containing a private key.
-
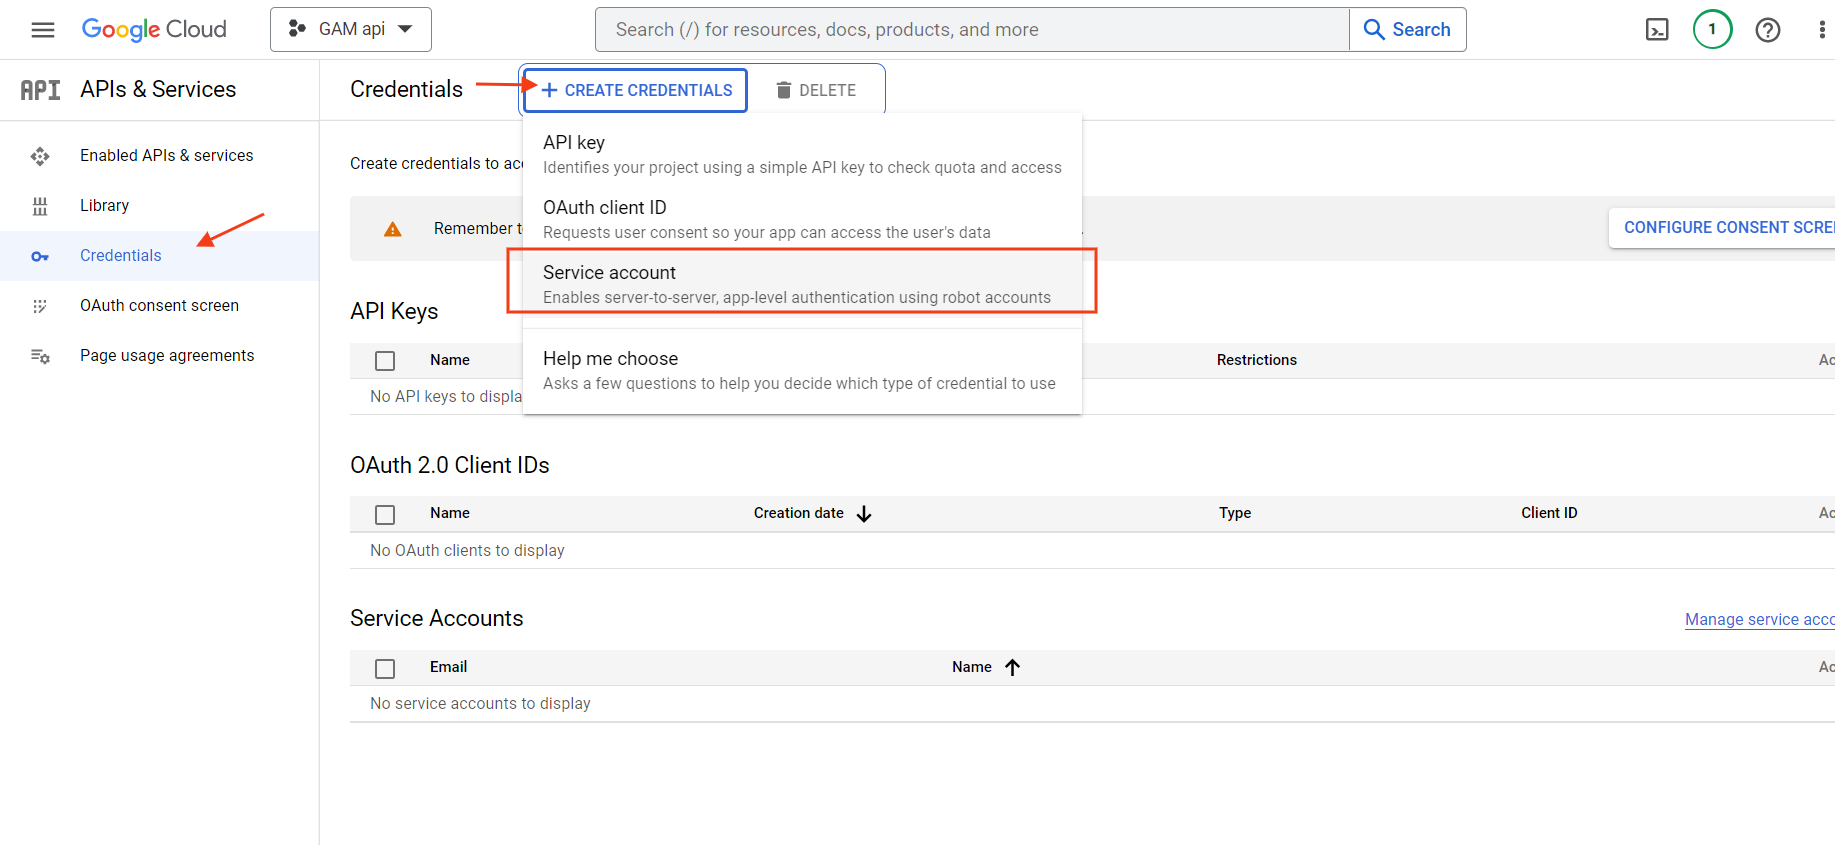 Screenshot from Google API Console Credentials page, Deccember 2022
-
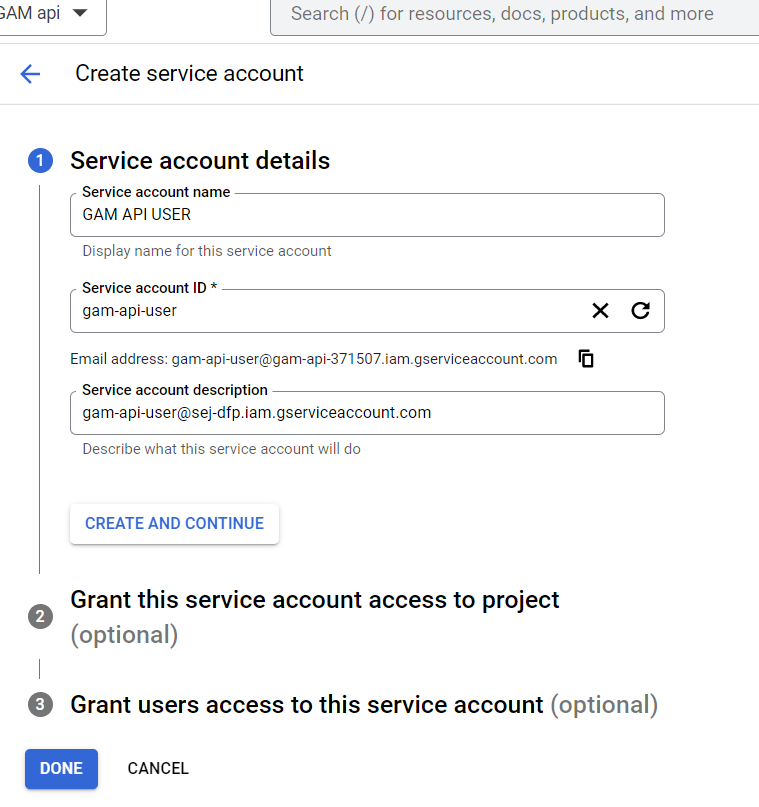 Screenshot from Google API Console Credentials page, Deccember 2022
- Fill in the service account details you’ve created above.
Assign the role “owner” and create the service account OAuth2 credentials.
Then, click on the created user and create JSON type key, and download it.
-
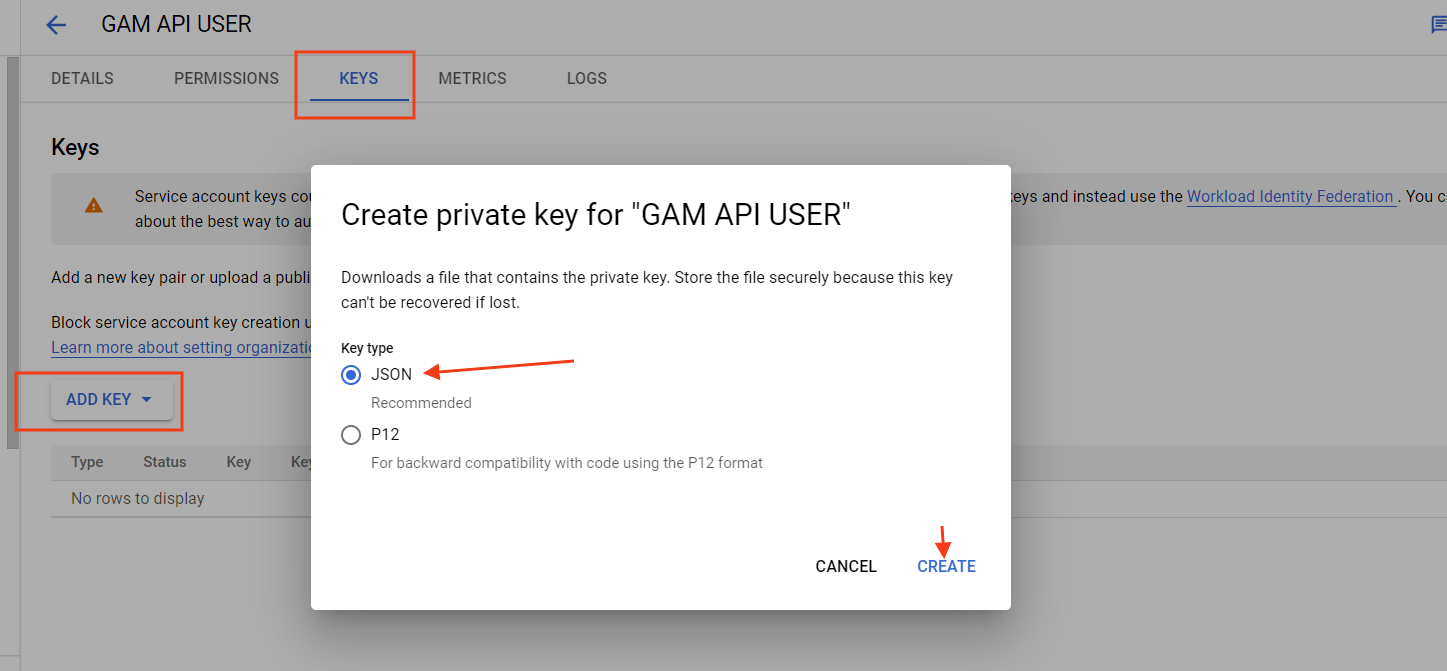 Screenshot from Google API Console Credentials page, Deccember 2022
Step 3: Download Project
Download the project zip file and unzip it, directory (alternatively, you can use the git command tool to clone the repo).
Install composer for your operating system in order to build the project.
Step 4: Change your PHP.INI
Change your php.ini (located at /xampp/php/php.ini ) file and enable “extension=soap” by removing “;” in front of and set “soap.wsdl_cache_ttl=0” and restart Apache from the control panel of XAMPP.
Step 5: Create Subfolders And Build The Project
Once you have everything set up and unzipped, open composer.json file and change “googleads/googleads-php-lib”: “^44.0.0” to use the latest version “googleads/googleads-php-lib”: “^59.0.0”.
Check for the most fresh version at the moment you perform this.
Search and replace in /app/ folder of the project “v201911” with “v202202”, because that git project wasn’t updated since 2019, to use the latest version path of libraries.
Open the command line of your PC and switch to the directory where you’ve unzipped the files (using cd command or right-click inside the folder “Git bash here” if you have git installed), and run composer update in the PC terminal or git terminal.
It will create subfolders and build the project.
Step 6: Set Up Your Google Ad Manager Credentials
Move the downloaded JSON key “gam-api-54545-0c04qd8fcb.json” file into the root folder of the project you’ve built.
Next, download adsapi_php.ini file and set up your Google Ad Manager credentials in it.
networkCode = "899899"
applicationName = "My GAM APP"
jsonKeyFilePath = "D:\xampp\htdocs\dfp-prebid-lineitems\gam-api-54545-0c04qd8fcb.json"
scopes = "https://www.googleapis.com/auth/dfp"
impersonatedEmail = "gam-api-user@sej-dfp.iam.gserviceaccount.com"
jsonKeyFilePath is the absolute directory path to the JSON key file in the folder root.
Step 7: Set The Content Of The File
Finally, navigate to the file /script/tests/ConnexionTest.php and set the content of the file like below:
putenv('HOME='.dirname(__DIR__)."/../");
require __DIR__.'/../../vendor/autoload.php'; $traffickerId = (new \App\AdManager\UserManager())->getUserId(); if (is_numeric($traffickerId)) {
echo "\n====Connexion OK====\n\n";
} else {
echo "\n===Connexion KO====\n\n";
}
In your terminal (or git bash console) test the connection by running the command (if you are in the /script/tests/ folder).
php ConnexionTest.php
You should see a message “====Connection OK====”
Step 8: Configure The Parameters
Navigate to the file /script/tests/ConnexionTest.php in your project and open it.
Copy and paste the below code into that file, and configure the parameters in the $entry and $buckets arrays per your needs.
putenv('HOME='.dirname(__DIR__)."/../");
require __DIR__.'/../../vendor/autoload.php'; use App\Scripts\HeaderBiddingScript; $bucket_range = array();
$Your_Advertiser_Name = 'Sample_Advertiser';
$buckets =
["buckets" =>[
['precision' => 2, 'min' => 0, 'max' => 4.00, 'increment' => 0.01],
['precision' => 2, 'min' => 4.01, 'max' => 8.00, 'increment' => 0.05],
]
]; foreach ( $buckets["buckets"] as $k => $bucket ){ $request_bucket = array( 'buckets' => array( $bucket ) ); $order_name = 'Your_Order_name '.$bucket['min'].'-'.$bucket['max'];
// echo $order_name.'<br/><br/>'; $entry = [ 'priceGranularity' => $request_bucket, // can be 'low', 'med', 'high', 'auto','dense', 'test' 'currency' => 'USD',
//'sizes' => [ [1,1] ,[160, 600], [250, 250], [300, 250], [300, 600], [320, 50], [320, 100], [300, 100], [336, 280], [728, 90], [970, 90], [970, 250]], 'sizes' => [ [250, 250] ], 'orderPrefix' => $Your_Advertiser_Name, //prebid advertiserName 'orderName' => $order_name
];
$script = new HeaderBiddingScript();
$script->createGlobalAdUnits($entry); }
Optionally you can also specify ‘geoTargetingList’ => “dz, pk, ke, pt” or custom key value targeting customTargeting’ => [‘amp_pages’ => yes’] if you want your header bidding to work only when the custom key value is set.
Run the command below and it will start creating line items per the bucket settings you’ve specified.
php ConnexionTest.php
There is a tool using Python that is used similarly; you may want to give it a try as well.
Debugging
For debugging, there are a few browser add-ons you can use to see if the auction runs without errors.
Alternatively, open your webpage URL using “/?pbjs_debug=true” parameter at the end of the URL, and watch console logs messages.
You need to make sure that hb_pb key values are passed to Google Ad Manager. Use “/?google_console=1” at the end of the URL to open the GAM console, and click on “Delivery Diagnostics” of each ad unit.
You should see that hb_pb values are set and passed to the ad server.
-
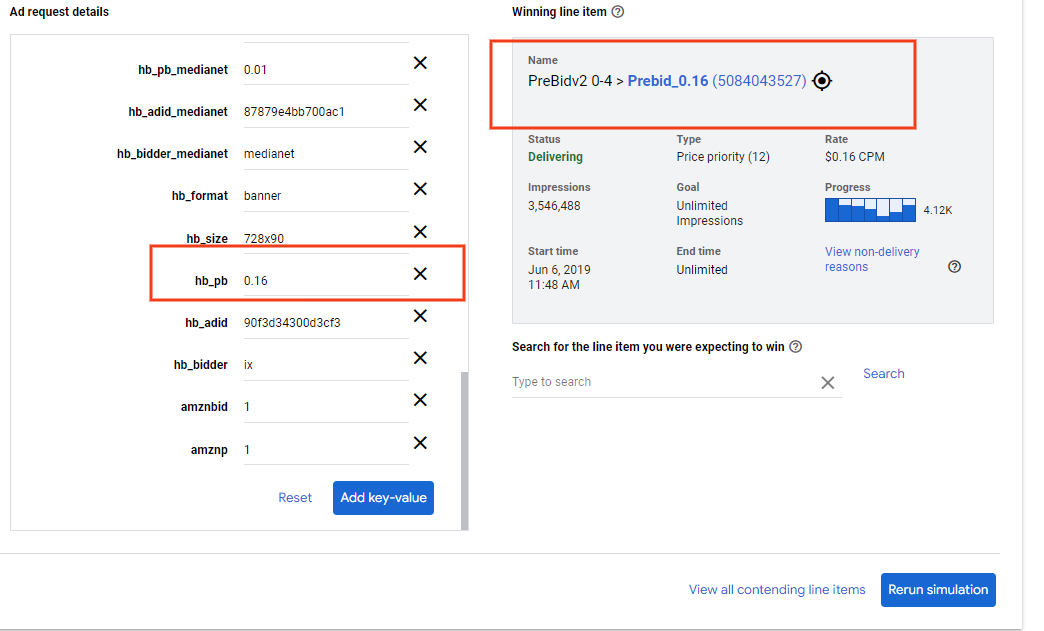 Screenshot from Google API Console Credentials page, Deccember 2022
Choose A Consent Management System
Users’ privacy is one of the most important factors, and you want to make sure that you comply with both GDPR and GPP.
The detailed instructions on how to set up a consent management system in your wrapper are here.
There are many providers which comply with IAB’s latest standards, and here are a few of the most popular ones:
Conclusion
You may find it surprising that setting up header bidding involves so many steps, but it is really worth it to implement. It can easily boost your revenue by +30% or more by creating selling pressure on Google Ads.
This guide is for technically savvy users – but if you have questions and issues, there is an Adops slack channel you may subscribe to and ask questions to the community.
I hope that after reading this article, you will find it easier to set up header bidding and enhance the monetization of your website.
More resources:
Featured Image: Search Engine Journal
